 Keurig K155 Coffee Maker Review
Rated by Jennifer
Rating: 4.5 Stars
UPDATED: 2023
In my Keurig K155 review, I found myself thinking back to time taking classes, and the newly added lounge had a coffee bar in which a commercial grade Keurig was very much like this one (could have been this one for all I knew!)
It got plenty of activity, so I can tell you there is a need to have specially designed brewers like this in the public sector where people can get their cup of joe without a hitch.
If you are thinking of investing in a performance standard industrial brewer that can handle heavy, consistent use, lets consumers make a few choices in terms of size and temp, and overall, looks good without being much bigger than some of the homefront counterparts, read on.
[toc]Keurig K155 Dimensions
Those listed on the sales page were a little tricky: what I read was “16 by eight by 10” and 6 lbs…(whoa…six pounds?? This is a commercial Keurig brewer – I had to do some fact-checking), especially since the shipping weight listed below read “21 lbs” and we know that cardboard packaging doesn’t weigh 15 lbs).
The manufacturer’s site lists the dimensions of the K155 as…
- Measurements:13.25″ H x 12.25″ D x 9.5″ W
- Weight: 18 lbs
- Height: (with the K-cup chamber fully raised): 16″
- Clearance (drip tray in place): 6″
- Clearance (drip tray removed): 7 3/4″
- Cord length: 48″
This is a heavier unit, guys…but overall, its size is nice and not cumbersome, which is good.
And for most under-cabinet use, this is a pretty good size. And most tumbler-style to-go cups should be no problem as most of them are 7.25″ in height on average.
Features
- Commercial-UL Listing
- NFS Certified for food and beverage environments
- 90 oz water reservoir
- Brew Sizes 4, 6, 8 and 10
- The internal tank can be drained
- Has direct water-line hookup adaptability
- Can drain internal water tank periodically
- LCD touchscreen for making selections and setting time, language, and auto-off
Keurig K155 Compatible Accessories
- Direct Water Line Plumbing Kit for Keurig K150/K155
- Water Line Plumbing Fitting
- Direct Water Line Plumbing and Filter Kit
- Solofill K3 24K Gold Refillable K-Cup
 Buttons and Controls
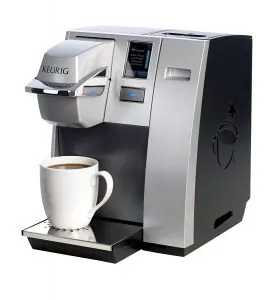
All of the function with the Keurig K155 brewer (mainly) takes place from within the LCD touchscreen on the front panel. There is an on/off power button, which is located near the back left side of the unit (near the K-Cup chamber). Below the touchscreen window is the Brew button.
The Touchscreen window is somewhat reminiscent of the 2.0 models in terms of being able to choose certain functions and set them easily. The touchscreen shows brief guidance tips and statuses in the window and random coffee-related graphic animations while brewing is in progress. Through the various menus, you can
- choose the desired brew size setting,
- Set the clock
- adjust the brew temperature from within a threshold of 5 degrees above or below the 193-degree default setting,
- Set or disable Auto Off
- set or change the preferred language from English, Spanish, or French
- add “contact” information – this part is strictly optional
The “contact” part is only used to reprogram your brewer settings. It pretty much is an alpha-numeric keypad approach. Chances are, you may never need to use this, although it could help with having an easier time with customer support.
The temperature range is the most impressive I have seen so far – the most comparable is the Keurig Special Edition and the newer K-Elite, which have this too, but instead of a 5-degree window, you’ve got a range of 188 degrees to 198. You can go within 5 degrees down or up of this range, although the default is set for 193.
Regarding an issue like high altitude – The K155 does not have a high altitude setting like some of the other models do; as per the manual, you are encouraged to bump the temperature down 5 degrees to compensate and prevent the water from getting too hot.
I think you will love this touchscreen; there are actual “pictures” on it rather than icons. When you want to set a preferred size, you can “delete” the last one, and a red “x” will show and a green check mark on the others.
 Reservoir
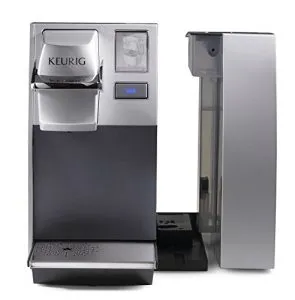
The K155 water reservoir is quite large, with a 90 oz capacity. It is triangular and fits into the side nearest the control panel. You can easily remove it to refill using the water source of your choice, but it also has a lid, so if you want to pour from a pitcher or something – even better and easier approach.
One nitpick is that it’s probably hard to tell how much water is present since it’s not transparent – however, in the front, there is a “water window” (my words), which you can see.
Also, the touchscreen will prompt you with the message “Fill water reservoir” if the level does get low, so no worries about seeing it.
Also, per the manual, don’t put either the reservoir or its respective lid in the dishwasher (I don’t know why people would, though? it looks like it’s too big anyway)
Ease Of Use
When you’re just going to brew a cup of coffee, you’ll find yourself “greeted” by the touchscreen graphics. Opening and placing a K-cup into the chamber will set off the menu showing the four brew size settings for you to make a selection. Also, this is an open-platform brewer (yay!) But let me stress, however, this is not an open platform about the refillable K-Cups (neither are the other OfficePro units either, I should add). The one recommended brand to look for is the Solofill K3 brand.
If you want to make some changes to the brewer settings, it’s strictly a matter of choosing plus or minus to increase or decrease and pushing “OK” when you’re satisfied. Pretty reminiscent of the “Platinum” series.
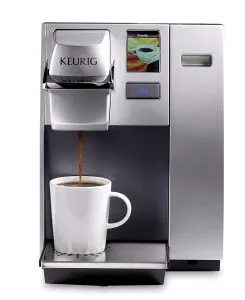
Here is the K155, the church I used to attend has one in the main sanctuary area, and I’m taking it upon myself to test it out. It worked pretty well, I got my cup in about a minute, and it seemed adequately hot. As a small disclaimer, I think this might be the K150 (the nearest predecessor). As you can see, the brew chamber is black. But close enough, am I right?
Drip Tray
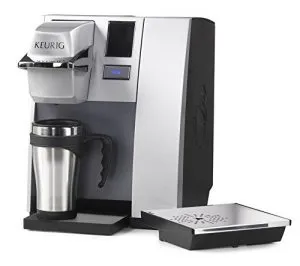
I like the drip tray as it’s a nice size with a metal grate; if you take it off, the inside looks slightly slanted, as you can see from the side. Remove both of them, and you should have enough room to set a tumbler on the base, a cup with a maximum height of 7.5″. That’s pretty generous, as most tumblers are close to that size range.
Direct Water Line Connection
Besides its size and shape, the other distinguishing feature is that you can install a direct water line connection to this unit and make refilling the reservoir a thing of the past. This would be highly recommended in high-traffic environments like restaurants or college campuses. If you have experience in plumbing work, this would be worth the effort, and knowing that fresh water is always on tap will be great come that morning rush in most public venues!
Although the purchase and use of the direct water line installation kit can be a real boon when operating your brewer, it is certainly an optional step, and for a small work environment with a staff of, say, 10-15 people, you may not even have a need for this procedure at all; especially since 90 oz can go a long way, and produce about 18 beverages on average.
Yes, the plumbing kit works for this one, too!
I know there has been some confusion here, as the sales page says the K155 “cannot be directly plumbed”. But as I follow up with a lot of second opinions, I’m here to tell you that it certainly can be. The kits I have seen all state they are compatible with the K150 and K155.
Draining and Cleaning
Yes, this is one brewer where you can drain the internal tank if you ever want to store it. The one other unit that makes this well-known is its cousin, the OfficePro K145. – the manual will walk you right through this, but if you’ve ever been concerned about backed-up water, worry no more, you can do this by removing the plug from the tube in the back and letting backed-up water drain out naturally.
 Keurig K155 Consumer Reviews and Ratings
It was a great occasion for me to discover the Keurig K155 reviews. Ratings were overwhelmingly positive or satisfactory, and the negative reviews were in the minority, on which I will elaborate on both. I also noticed a pattern; although this brewer is commercially UL listed, at least half of the respondents bought it for personal home use. I can further infer that they were strictly after the performance grade first and “bells and whistles” second.
Of course, one of the major highlights – people enjoyed not having to deal with “any of that DRM nonsense” Their employees could bring their own pods from home with them and help themselves worry-free. The touchscreen feature is great, like having the advantages of the 2.0 without fear of seeing the “oops.”
Positive feedback from users new and well beyond the honeymoon stage included statements like “sturdy,” “durable,” “don’t have to refill it as often,” “a good fit and size despite being an industrial unit,” and “only have to clean the holder periodically.”
What were one or two things people wished were different? A few people said they wished it had a 12 oz setting. The K155’s predecessor, the K150, does have a 12 oz setting btw. And Secondly, regarding the ‘default brew size setting being 8 oz,” You are free to pick any size and even delete brew sizes from the touchscreen menu, but for some reason, just not the 8. To me, this felt more like a performance quirk than anything else.
And OK, this one is negative…A few people mentioned a “weird funky smell” upon receipt of their new unit. However, it was a problem that was easily remedied. (It would not put me off, however)
As for the 2018-20 period update, reviews remain almost the same place. One remark about the touchscreen and asking why it isn’t possible to go into sleep mode. A minor issue, though. The way this screen is designed should be a possibility.
Pros
- Very well constructed and durable
- Made for heavy use in an industrial environment
- Drainable internal water tank
- Direct water line attachment capability
- Will accept all brands or K-Cups
- Programmable options to set the desired time and brew size
- Can adjust the temperature within a 5-degree threshold of the factory default setting
Cons
- Brew size settings are a little quirky
- A few comments about chemical odor upon new receipt of the unit
- May only accept certain types of refillable K-cups
Price
So all of these things combined make the K155 pretty attractive for the money – stronger, more reliable, less need for refilling, and confirmation of all these qualities -The Keurig K155 is a little more expensive than most models due to its weight and keeping in mind that this is a commercial grade item too.
I do periodic updates, which means checking prices and availability ever so often… At the time of this update, I saw a higher price on Walmart than Amazon, but if you check up on eBay, you can get the best deal and grab the K155 for under $300. You can check either venue below to see if that’s still the case:
Keurig K155 Office Pro Commercial Coffee Maker Keurig K155
![]()
Aside from the unit itself, what would be your other expenses? If you want to connect it to a direct water line, the equipment (see Compatible Accessories) is all sold separately but would be a one-time expense. The Solofill K3 24kt Gold refillable K-Cup would be your other main “extra” item if you are hoping to use refillable in addition, in terms of price and quality, they are comparable to most other brands of similar refillable K-cups.
Has the K155 Been Discontinued?
As I overheard this, I went to check. It has not been discontinued. There is, however, another commercial-grade brewer that may slowly supplant it, but the K155 is still widely available; the price is still under $300 on Amazon at the time of this update (04/23)
Summary
Overall, I think the K155 has a lot of pluses and only a few negatives, and I wouldn’t hesitate to recommend it to anyone looking for a performance-standard brewer for the office or establishment.
Probably overkill for a single-coffee drinker household – but in a busy area, a home run machine in my book 🙂


