


 Keurig K145 Review
Reviewed by: Jennifer
Jennifer’s Rating: 4.3 Stars
Updated: 04\13\2023 – Even in 2023, this machine is a solid performer, and there is now an updated K155 OfficePro which can be found in the Amazon affiliate link below. It’s very similar to the K145 with some handy updated features.
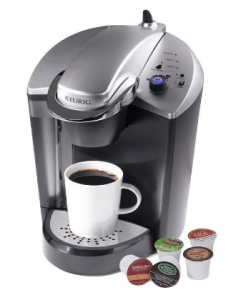
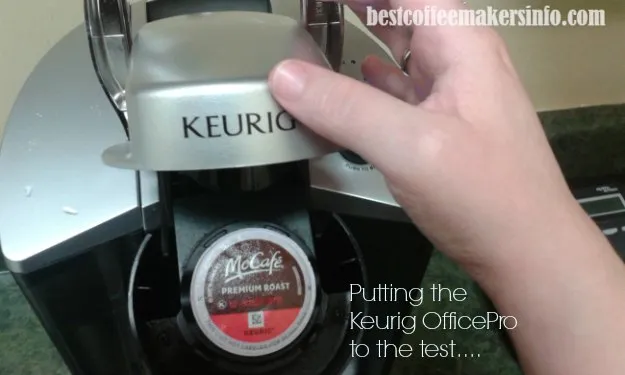
In this in-depth Keurig K145 review, I take a good look at an industrial-grade single-cup brewer worthy of consideration – it’s also known as the OfficePro, so it is made with public venues in mind. In appearance, it is very similar to its home-front “relatives,’ but it works harder and has the added advantage of an inner-tank drain function which is great if you are someone who needs to transport that office essential safely. Aside from that, it produces good, hot coffee; of course, it’s not without its sticky spots, too, like the more industrial-strength sounds.
This is a no-frills approach brewer made for the workplace. A big thank you to my sister-in-law, who works in an office administration setting and whose main office shares ownership of the Keurig K145. This helped provide me with a good live testimonial to go on. Later on (2018 update), I got an opportunity to test out this model at a family event, so I will also provide my findings.
![]()
[toc]
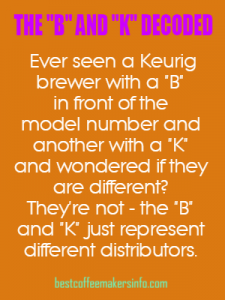
Model Name and Number
This is the Keurig K145 OfficePRO Single Serve Brewing System (sometimes the model may also be referred to as the “B145” – it’s the same)
 Dimensions
Amazon lists the dimensions of the Keurig K145 as 16.7 x 15 x 12.6 inches and the weight as 14.9 lbs (it’s a little bit of a heavyweight); when cross-checking the manufacturer’s site stated dimensions read: 13.25″ h by 12.25″ d by 9.5″ w.
I’m unsure of what led to this rift in the dimensions, but I got confirmation that when the lever is raised in the front as part of the process of starting a cycle, this puts the height at about 17.5″. This is good info if you’re concerned with cabinet-to-counterpart clearance.
With regard to the clearance between the dispensing area and the drip plate base (when the tray and plate are removed), there is 8″ of space that should allow for travel cups fairly easily.
The Keurig K145 has a 66″ power cord, which is pretty impressive. I’m about 5 foot six and that’s exactly how long this cord is. LOL 🙂
What’s Included?
In addition to the brewer is a sampler bonus pack of Kcups – however, take this with a grain of salt as some consumers claimed they did not receive the bonus, which I felt was more a case of oversight than misleading. There is also a start guide and one year warranty.
I’m also pleased to report that it can be serviced because this is a commercially listed coffee maker. Most home-use Keurig’s are not serviceable. The manual explains the in’s and out’s of it:
Manual available here: Keurig K145 User Manual
 Features
All of the major features…
- Three brew sizes (6, 8, and 10)
- Brew/Drain selector switch
- Auto-Off
- Commercial-grade performance
- 48-oz reservoir
- The internal water tank can be purged
- Serviceable
Buttons and Controls
All of the control parts are located on the left side and include a rotary knob which you use to set the desired brew size (6, 8, or 10 oz.) They also show icons with the size on them, so it’s easy to read. The brew button is located right in the middle of the knob with its respective words,
Above the knob is the “drain ” function. To the right are the power button and the Auto-Off. The indicator lights include: Add Water, Descale, and Heating, and each respective command has a different color light associated with it (e.g., “Descale” is amber, “add water” is blue.)

How to Drain the Keurig K145?
The most unique feature of the Keurig K145 is the drain setting which will enable you to “purge” the inner tank – and it’s exclusive to this model. A Brew/Drain selector switch is in the back, which is only vaguely visible from a front parallel view. My first impression was that it was hard to tell what the heck that thing was, but as I dug deeper, I made this discovery and what it was for…it’s much more visible from a top or back view.
On the side of the brewer that faces the water reservoir, there is a small tube near the top. You’ll notice it when you detach the reservoir, as it’s hard to see. This is the vent nozzle from where internal tank buildup will flow out.
The dial selector at the back needs to be set to the correct procedure – switch it to “drain” before getting ready to purge the hot water tank; remember that the next time, you’ll want to set it back to Brew.

Personally, I think this tank drain feature is great…I wish all Keurigs had them. I wish this little knob thingy could have gone in a less obvious location, maybe a little further down in the back.
Descaling
The descaling procedure is pretty cut and dried – it’s very much the same method used on all Keurig models. The built-in sensors will alert you on the control panel if you aren’t on the up-and-up here. The only difference is that you are encouraged to perform a de-scale every six months as opposed to the usual 3. I’m unsure why that is, but it’s nice to know.
Reservoir and Drip tray
The Keurig K145 has a 48-oz side-mounted reservoir. You can refill the reservoir by removing the lid on top and pouring from there or pulling out the reservoir to fill at the sink; of which I would prefer the former since you have to line up the tabs on the side when replacing it.
Even though it is not included with the package, it will accommodate an optional water filter assembly and will improve the taste if you’re not using filtered/bottled water. You will need to choose the kit that is compatible with the 1.0 first-generation models and install it accordingly.
The drip tray and plate (metal) can catch up to 8 oz of overflow. Both are top-rack dishwasher safe. And of course, removal of them will give you some leeway for taller cups.
Ease of Use
The basic operation of the K145 should not be much of a head-scratcher. You’re looking at plug-and-play operation, pretty much, just that you’ll find yourself setting the dial instead of pushing the buttons more; the indicators have different colors, which is interesting.
The Auto Off feature is optional; you’ll know it’s activated if you see the green light next to the button. If you hit the button, the light will go out, and Auto-Off will be disabled. When punched in the brewer, the Auto-Off function is set to go off in about 2 hours.
The most you will notice regarding the noise is the water pre-fill stage that happens shortly after a complete brew cycle. This is to be expected and nothing to worry about. In general, it will take about 20 seconds to reheat/refill.

Here I am making an 8 oz cup. It was pretty expedient; of course, a part of that could have been the chance that it was used by another person five minutes before I did, which means the next cup would brew faster since it is already in that “warm” stage. When I retrieved my cup, I noticed the blue light on the dial blinked a little before the power-off mode kicked in.
The average preheating time is about 4 minutes if it is a “break in” session or the first brew of the day; subsequent brews will be much more expedient, around 20-30 seconds for preheating afterward. If you have a busy work environment, this should bode well.
There will be slight drips from the vent nozzle (you may or may not notice it), which is a normal occurrence and an indication that the water is heating.
 Keurig K145 Reviews and Ratings
Well, if there’s anything I discovered in consumer reviews that were spoken frequently, almost to the point of being redundant, it was all the comments about the volume of this machine. Some were rather vociferous about it, while others took it in stride, seeing the industrial-level inner equipment of greater strength as par for the course.
Other than that, what I saw overwhelmingly in the positive comments included a pattern of “sturdy,” “fast heat up,” and “love the drain tank feature.”
Comments on resulting coffee temperature have some variation, of which some basis could be formed, the default factory setting is to a range of 187-192 degrees. This is not one of those Keurigs with the brew temp adjustment. A consensus was going on that six and 8-oz brews turned out “stronger.”
There seemed to be some confusion about the question of using refillable since the proprietary My K-Cup is deemed not a fit for the K145. However, people were finding other brands of reusable K-cups that were working out just fine; one, in particular, was the Solofill K3 Gold and Chrome. Several mentions of this led me to deduce that it was the preferred choice due to fit and performance, as I understand the K-cup holder assembly is a little different on the inside.
There seemed to be as many people who had bought this for home use as there were getting it for their workplace, which was telling; they were seeking a more powerful upgrade.
The “noisy” part…again, this is a subjective issue here, but since so many people commented on it, I thought I would include a video of the K145 in action so you can judge for yourself.
Video Courtesy of Laly Flores
I would have made a video myself…..Not exactly the best setup for it, though…Other people were in the lounge room, and their din of talking would have been too distracting. I didn’t think it was all that bad, personally, regarding the operating noise level.
Pros
- You can drain the inner tank
- Built stronger to withstand heavy use
- The ability to interrupt or halt brew cycles
- Auto-off feature that can be set at will
- Fast reheat time between brew cycles
- Can be serviced (check owner manual for info)
- You can use any brand of Kcups you want
Cons
- Some comments on operational noise
- Cannot use the My K-Cup brand refillable K-cups
- Warranty may not be honored for home use
- A few “extra” accessories are absent
Price
Well, first, the bad news. When I did this review about five years ago, it was priced in the below $200 range…but like most Keurigs that have aged, maintained a good rep, and getting harder to find, the price has jumped. Don’t shoot the messenger – it’s still a very good coffeemaker.
I would get one, but I would act quickly, too, as the stock seems to be getting limited. Although you might be able to land it for a lower price if you are willing to nab one that is pre-owned (of course, you might get lucky and find one in the “like new” category, just because the box was scuffed up…)
You’d probably spend about $20 more in the ballpark for the K145…and in terms of the coffee Kcups themselves, since the type or proprietary brand does not limit you, you’d have no difference in your coffee budget with the Elite over the K145. So basically, what you’re paying extra for is a stronger machine that can take more frequent reheating and brewing and with a drain tank setting, not to mention eligible for service, so when you look at it, that sounds like a pretty fair deal, dollar-wise.
![]()
Keurig K145 Summary
My overall rating: 4.3 Stars – Excellent
In short, I think it’s fair to say that the Keurig K145 is a more heavy-duty version of the K45 Elite. Appearance and design are pretty similar, but esthetics aside, you may find greater advantages with the K145 Office Pro. And yes, it depends on whether it is more important to have a quieter machine or a more rugged one!