 Cuisinart SS-10 Review
Rated by: Jennifer
Jennifer’s Rating: 3.7 Stars
Welcome back with a new Cuisinart installation! In my Cuisinart SS-10 review, we’ll cross-examine this successor upgrade of its ever-popular SS-700. A slightly smaller reservoir and all-over size are the first apparent characteristics; it’s got the user-friendly backlit window and some of the other great features….some is no doubt you will find useful.
But can it hold its own compared to the model it has easily supplanted? Let’s take a good look at that right now.
[toc]What’s Included with the Cuisinart SS-10?
The Cuisinart SS-10 comes with a start guide, charcoal water filter assembly and filter cartridge, a HomeBarista refillable cup, and a limited 3-year warranty, as do all of Cuisinart’s other models.
Colors Available
The SS-10 has three multiple color options – there is Silver, Matte Black, and Light Gray (which is more of a brushed metal version of the Silver one, appearance-wise)
Dimensions
The listed dimensions looked confusing at first – listed on Amazon’s sale page is 11.03 by 9.33 by 12.13″, but you look to the right and see a different measurement for what is actually the refurbished version – why is that? I felt that had to be in error – but the manufacturer’s website provides a figure of 11.03″ length, 9.33″ width, and 12.13″ height, so Amazon nailed it.
The weight is provided as 9.5 pounds, and the power cord is 29″ in length.
If you are checking your cabinet space when the brew chamber is fully opened, the height moves to 16.5″. As for clearance; some people are easily getting tumblers in, which tells me the SS-10 has a good amount of leeway. With the drip tray in place, there is 6″ of space between the brew head and the tray, if you remove the drip tray, you can count on clearance of 7.25″ of space for something taller to go there.
Features
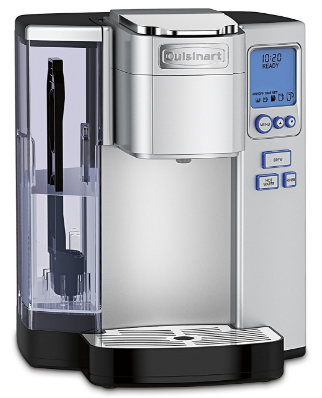
As a slightly more modernized and smaller version of its predecessor, the Cuisinart SS-10 has the same great additions of rinse/hot water button settings, brew sizes 4 through 12, and a handy little hideaway compartment for the bonus reusable HomeBarista cup to be stored when not in use.
The LCD window, with backlit blue color, displays the time, the brew sizes settings and the various status readouts. With the arrow keys and menu, you can change the time, program it to come on, and utilize Auto shutoff or program auto shutoff to your liking -by default, it kicks in in about 30 minutes of inactivity.
There is a charcoal filter to ensure water purity with each brew and an option to change the temperature.
 Buttons and Controls
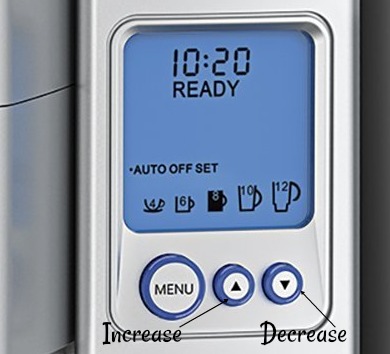
Very similar once again, the center of operation involves a backlit LCD window and several different buttons: A menu and two arrow keys with which things like the time, auto-off, brew size, and programming the maker to come on and go off can be set easily.
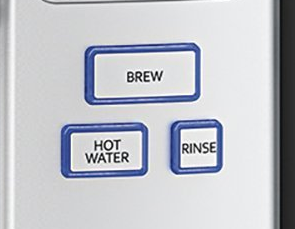
There are three function buttons below these: Brew, Hot Water, and Rinse. The latter two are great for those occasions when you want to make other beverages like hot cocoa as the “Rinse” function removes the chocolate residue so it won’t affect the next coffee. The Hot Water is great for preparing food-based items like instant soup.
By default, the brewer goes to 8oz straight away, but you can program it for the desired other sizes. The max temperature that the Cuisinart SS-10 will reach is 192 degrees F. By default, the SS-10 is set to “hot,” but if you prefer a little drop-off for other beverages, you can adjust the temp down slightly as desired using the Menu button as with the other settings.
A power switch is a little tricky to spot– it is located below the reusable cup hideaway compartment on the right. Besides the obvious reason, you can also hit the power switch to halt brew cycles (or just hitting the Brew button will do this too)
My impression (and others as well) of the arrow buttons is that they are a little quirky in how their function is arranged. For instance, if you want to adjust the temperature, the “up” arrow will bump up the temp, and the “down” arrow will decrease it. For setting the clock, the “up” arrow indicates moving by hours, and the “down” arrow indicates minutes. The same thing goes for the brew size settings.
The “up” arrow will increase it, and the “down” arrow will decrease -that makes sense – but why are they arranged from larger/greater to smaller/less? Most brewers do like most appliances: smaller to larger. This may not be a deal-breaker, but it could take some getting used to.
 Reservoir
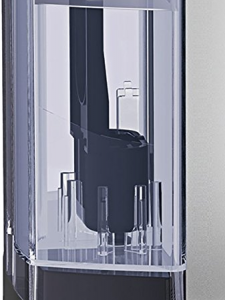
The Cuisinart SS-10 has a 72 oz water reservoir – fairly big, not to need refilling for a while. It has a somewhat “L” shaped design that wraps around the maker slightly towards the back.
You can pull out the reservoir easily for filling and refilling or remove the lid, which also comes off; the reservoir lid is not hinged. There is a minimum fill line and max in addition.
Unlike the LCD control panel, the reservoir lacks the blue illumination feature. Sorry to have to report that, as I wish it did since it would be nice to have. Especially in the case of a poorly lit kitchen, and you want to check the water level.
The Charcoal Filter
There is a slot for inserting the charcoal water filter that is flush with the side that mounts onto the machine. The included water filter inserts easily into the slot in the reservoir that faces the unit directly. I think its arrangement is odd. It appears to sit away from the water intake spot. Like many other water filters, the carbon cartridge works optimally if it is changed periodically every month.
Drip Tray and Plate
The removable drip tray has a metal plate on top. A round hole in the center makes it easy to remove if you need to empty any overflow. When both are removed, there is a base on the coffee maker revealed with which you can set larger or taller travel cups. Both the drip tray and the metal grate are top-rack dishwasher safe.
Cleaning and Descaling
When it comes time to descale, a digital readout will appear in the LCD window (it’s subtle so that you might miss it) if buildup triggers the system in some way – however, as per the manual, it will not stall a brew cycle you’re on, unlike some brewers that won’t let you proceed until the job is done. Be mindful, though, of the three-month commitment to doing so.
The “Rinse” function is strictly optional but recommended to flush out the residue from the making of hot cocoa, soup, or things you might make with the Hot Water setting; periodic flushing may help keep residual food odors, or aftertaste, from getting into your coffee.
 Reusable K-Cup, Capsule Holder, and Compartment
You’ll enjoy the bonus of the included reusable cup – it consists of several parts: a filter cup and lid; inside is the filter basket you fill with your favorite coffee grounds. At times when you plan to use it, you will have to remember to remove the filter assembly housing in the pod chamber – it pulls out pretty much like its competitor models by gripping the top edges until it gives.
This reusable cup holds about two and a half tablespoons of grounds, and as per the user guide notes, you are encouraged to go with a medium grind (which I believe is so as not to restrict the flow of water too much). Always remember to clean the capsule holder periodically. You’d need to twist off its bottom piece (the funnel) to be able to reach the exit needle inside.
The reusable cup stows away in the side compartment and is top-rack dishwasher safe. I’m pleased to report that you will be free to use all your favorite Kcup brands and flavors – Yay! Just be mindful of how you handle them in the chamber 🙂
Pros
- Auto-shutoff that can be changed
- The open platform accepts all brands of Kcups
- Five different brew sizes to choose from
- Rinse feature
- Can program the clock to go on and turn off at a given time
- Can interrupt and re-start brew cycles
- Bonus reusable Kcup with storage compartment included
Cons
- Cannot adjust brew strength
- Lacks an illuminated reservoir
- Menu buttons can be a tad quirky
- The water filter sits in a weird position
- The pod chamber is a little tricky -need to seat pods correctly
 Cuisinart SS-10 Consumer Reviews and Ratings
The ratings and reviews for the Cuisinart SS-10, generally, seem to dip slightly below average (4 at least). I have discovered several “biggies” here that could explain this, however.
Positive reviews cited: “expedient,” “like the longer warranty,” “convenient,” and the ever-common “loose grounds come out great” As an interesting point to note, a lot of responders had owned a previous single cup brewer (this was not their first) and so they had a reference point. Wow, if I had a dime for everyone who missed their SS-700 or 780? These comparison points fell into one of these three big camps:
One-the layout of the buttons, two-general sturdiness, and three – temp control. There were a couple of secondary issues, such as the absence of the reservoir light that the predecessor had and the strange arrangement of the water filter. I concur – why doesn’t it have that pretty reservoir light? I would appreciate something like that. Secondly, as I indicated previously, the water filter is made to stick in a strange location -right to the side of the reservoir wall. Most of them sit right above the water intake. I wonder if that doesn’t limit its function somewhat.
Back to the bugaboos that consumers had issues with. Although you can adjust the temp, there was only this option to choose “hot.” (I felt like they were expecting more than two temp options) This felt more subjective as just as many people felt that the resulting temp was just right.
Finally, some people had trouble with the pod chamber. Two things resolved them. One is making too big of a hole in the top of the pod.
Pro Tip: To avoid overly large puncture holes- it may be necessary to remove the rubber grommet from the inside of the top puncture needle. It does not serve any real purpose. Secondly, the pod has to be seated well at the bottom.
I think the crowd has spoken…the SS-700 seemed to be the preferred choice. I like the size, but I wish those other good features had been preserved. I do think the construction leaves a little more to be desired.
What’s With the Cuisinart SS-10 “EEO” Message?
A few reports surfaced that gave me cause for concern: A number of people were getting “eeo” error messages in the menu window. What panned out is that these were inoperable. When there were error messages like “add water” and “descale” that were out of line with the consumer’s actions, the simple act of unplugging and waiting a few minutes, then re-plugging it back seemed to take care of it
Also, as per the manual, pressing and holding the Hot Water and Rinse buttons simultaneously will reset the machine and eliminate the nuisance “Descale” message that has irked some owners.
But as I found out later -The user manual under the Troubleshooting section says if you get “eeo” in the display window to “Call customer support” along with the number, so it is a whole other ball game – a sensory defect, and clearly a sign of a dud.
Price
Can’t argue with the price – it’s reasonable for all the features described. At the time of writing, it looked as though the Silver version had the lowest price; you can check to see if that’s still the case here:
==>>See the Cuisinart SS-10 Brewer on Amazon
Factor in the added accessories that come with the SS-10; it looks like a pretty good deal. Especially since you have the added benefit of using your own coffee grounds.
The Verdict on the Cuisinart SS-10
If this is to be your very first pod brewer, I think it has almost all of what you will need to be satisfied. You can brew any K-cup without restrictions, heat up hot water for other products and get larger cups dialed in. If the weird arrangement of the arrow buttons doesn’t put you off too much, I don’t think you’ll have too much trouble with basic operation, especially if you’re used to moving through menu functions.
If you remember that you need to seat the reservoir properly -which I think is a little trickier due to that slight “L” shape, and seat the Kcup in the bottom well, you should not have too many difficulties ahead you. You may want to go easy with opening and closing the chamber because a number of people said it was a little delicate.
If you’re upgrading, you may notice the differences I stated above depending on your drink needs. Just be aware of the limitations and considerations.


